

In part one of this series I outlined some of the goals I had for Midi mapping. For this instalment I had planned on writing about my experience of setting up a Midi controller (I’m using the Midi Fighter) to trigger a series of hot cues in Traktor.
But as I began to write I realised that I was discussing how to achieve a specific mapping without properly explaining the principles I was calling on in order to create it.
So with that in mind, let’s step back and look at some of Controller Manager’s basic settings. Hopefully this article (and the next one) will provide you with enough information to get you started, so we can move on to mapping hot cues with confidence after that.
Midi mapping in Traktor
In theory, the overall concept of Midi mapping in Traktor is straightforward; link a button/knob/fader/key in the software to a corresponding action on a Midi-compliant device. The complexity enters when you need a single button/knob/fader to execute multiple actions simultaneously, or if you need said button/knob/fader’s behaviour to change when used in conjunction with other buttons/knobs/faders.
(I am also finding that the further you get into mapping, the higher your own expectations become, and suddenly hours are being burned in the minutiae of tweaking your controls!)

There’s no doubt that Traktor offers the ability to map everything you might need. Unfortunately, this level of sophistication comes at the expense of simplicity. I find the Traktor interface aesthetically overwhelming at the best of times and things certainly don’t get any easier in the Controller Manager.
I am starting to believe this may be the reason that some people end up walking away from creating their own mappings and rely solely on .tsi files! But we’re better than that…
So let’s dive in. The Controller Manager is divided into four areas: Device Setup, Assignment Table, Device Mapping and Mapping Details, which contain all of the functions we’re going to discuss.
Device Setup

Device Setup allows you to add, modify and delete Midi devices. Of the four sections in the Controller Manager interface, this is likely to be the section you use the least – unless you are doing a lot of importing and exporting of .tsi files. In my Controller Manager the Kontrol S4 and keyboard are listed by default; yours may well be different depending on what hardware you are using.
While my Midi Fighter was plugged into a spare USB port and ready to go, it still needed to be added in the Device Setup section. This was as simple as clicking the Add button and selecting Generic Midi. Once added, the Midi Fighter was listed as “Midi Fighter” rather than “Generic Midi”.
In-Port and Out-Port

Traktor enables the user to send Midi controls from one device to another, which is why there are multiple options for the Out-Port in the Device Setup Menu.
I selected The Midi Fighter as both the In-Port and the Out-Port to ensure that the Midi messages were confined to the Midi Fighter. Leaving Out-Port set to All Ports can cause the Midi Fighter to send messages to other Midi devices. At one point My S4 began exhibiting some very random behaviour, but once I switched the Out-Port on the Midi Fighter to “Midi Fighter”, things returned to normal.
Device Target
Initially I was a little confused between Device Target and Assignment. I checked traktorbible.com and after a little reading, things started to make sense. The Device Target defines which deck in Traktor the device will control. You can assign it to one of the four decks or configure it to affect whichever deck is in focus.

I want my Midi Fighter to be used on all decks so I set this to Focus. If I purchase another unit I may change this and set one unit to Deck A and the other to Deck B. This would also be the approach if you were mapping a pair of CDJs. There are pre-made .tsi mappings out there that are specifically for a 1:1 controller:deck setup.
Mapping details
The Assignment drop-down in the Mapping Details section on Controller Manager enables you to select a target device for an individual control in the Assignment Table. I am going to skip over the Modifier section for now. We will come back to this.
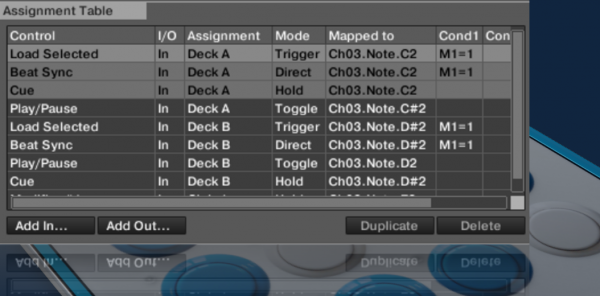
Assignment Table

The Assignment Table is where the meat of the mapping is done and at first glance, is probably the most daunting area of the screen. Having said that, those of you that work with databases will likely appreciate the field-and-row layout.
You build up your mapping one line at a time by selecting the Add In… button and choosing from the staggering range of controls that Traktor provides you with. There are a vast number of controls that you can incorporate into your mapping. I have yet to scratch the surface with 99% of these controls but am already seeing many of them and thinking “I could do something very cool with that”.
What has become quickly apparent is that my own personal way of thinking about how to use these controls often differs from the way the controls have been designed to be implemented. So, if you find yourself trying to set something up that just won’t cooperate, it may just be that your logic is different to Traktor’s.

One recent example: I was trying to use the Inc (increase) Interaction Mode. Without jumping too far ahead, the interaction mode defines how a control should be applied when a button (in this case) is pressed. In this example I wanted the highlighter bar in Traktor’s browser to move up the page each time I pressed the button.
When I tested the control out I found that pressing the button moved the bar down, not up. I quickly learned that Traktor treats the top row in the browser as 1 and the last row as 30 (assuming the list has 30 tracks in it). Seems obvious as soon as you think about it but in my mind “increase” will always mean up, not down.

While controls are created one line at a time, it is entirely possible to chain controls together by assigning them to the same button. A simple example would be combining Load Selected [track from browser] with Beat Sync. Now you can execute two actions with a single button press.
Traktor will highlight the currently selected line in the Assignment Table along with any other line that maps a control to the same button (or knob, fader etc…) This is useful in so much as it lets you see how the button is used in the mapping and should prevent the mapping of conflicting controls. In the screenshot above I have sorted the assignment table by double-clicking on the “Mapped To” column header. If you have your columns sorted another way, the lines will still be highlighted but they will not show up in a group. I regularly find myself resorting the columns in order to review what I have assigned to a specific button or deck.

In the screenshot above you can see that Load and Sync are mapped to the same button (Ch01.Note.D2). You will also notice that Cue is highlighted. This is because all three controls are mapped to the same button (4th row, 3rd in from the left on the Midi Fighter). In this configuration the Load/Sync control is executed when the button is pressed along with a Shift button. The Cue function is executed when the button is pressed on its own (I will get into Shift buttons, ie “modifiers”, later on). In the screenshot to the left you can see how it is physically mapped on the controller.
What’s next…
So we haven’t got to mapping our hot cues yet, but at least we now have some clue as to what a few of the Controller Manager functions do. Next time we’ll complete our Controller Manager talkthough by looking at the Device Mapping section (and specifically Hold, Toggle, Direct, Inc, Dec and Reset), as well as a few other important functions.
• SmiTTTen is a writer and DJ based in the US. Check out his Facebook Page for technical DJ articles, interviews, mixes and updates, and follow him on Twitter.
Check out the other parts in this series:
- Diary of A Novice Midi Mapper, Part 1 – Getting Started
- Diary of A Novice Midi Mapper, Part 3 – More Controller Manager in Traktor
- Diary of A Novice Midi Mapper, Part 4 – Basic Mapping for Hot Cues
- Diary of A Novice Midi Mapper, Part 5 – Mapping Effects
Have you got tales of hardship and triumph grappling with Traktor’s Controller Manager? Is this inspiring you to map your own Midi devices? Have you mapped in other software like Virtual DJ? We’d love to hear your thoughts in the comments.

SmiTTTen


")
