


In An Essential Guide To Organising Your Music Library (which was part four of this occasional series looking at ways of better organising your DJ music collection), we considered how we might like to classify the tracks and tags. My last stage of music library organisation is choosing the right tools and workflow to go from “download to deck-load”, which is what we’re going to look at today.
Before we get going, I’d like to stress once again that these are guidelines and not rules: They’re here to help empower youself to make your own choices. Ultimately, the important thing is to do what works for you!
How it used to be…
Before digital music became so prolific, collectors and DJs would create personalised and often abstract ways of grouping, ordering and sorting their record collection. Many would have piles of records and CDs ordered by purchase date, artist or popularity. When preparing for a DJ gig, you’d be restricted to 100 to 200 or so records to choose from. Each week you’d sift through what you played before and decide which tracks should remain for the next gig and which new records you would add.
Sleeve artwork became the quickest way to identify records, and although it is still valuable to have this for digital tracks the primary way we now search is through text-based tags that we are creating or editing. So how do we edit the metadata and ensure our libraries have the right information in today’s digital environment?
From download to deck-load…
So you’re shopping for music, you’ve listened to a few tracks and have decided to purchase a cart of a dozen or so digital downloads. What next? We’ve already seen that in most cases the information embedded in the files by your music store is either incorrect or inconsistent, so you cannot rely on it. In addition, many people like to perform additional processing on their music downloads before they are actually imported into their library.
To give you an idea of how this workflow might work, I’ll share my personal method for getting my tracks processed before I start to use them. Remember this is just one way of doing it, but hopefully it’ll illustrate some concepts for you.
(By the way, I have a PC-based system and use iTunes and Traktor, both which of course are fairly popular library / DJ applications.)
1. Download
Whether purchasing direct from the iTunes store or some other online store such as Juno, Beatport or AudioJelly, the first thing I do is move the location of the digital files to my editing folder, aptly called “AV Editing”, if they are not saved their in the first place. This is where all my editing takes place.
If downloading from the iTunes store, the tracks will automatically be added to your library. For DJs and those who like to keep control of their music, it is recommended to not “Keep iTunes Media folder organised” or “Copy files to iTunes Media folder when adding to library” in the advanced preferences of iTunes. This way you can edit the metadata outside of iTunes if you prefer, relocate where you’d like it to be stored in your own folder structure and then import it back into iTunes. If you’re using a different application to manage your library then the same principle applies.
2. Edit
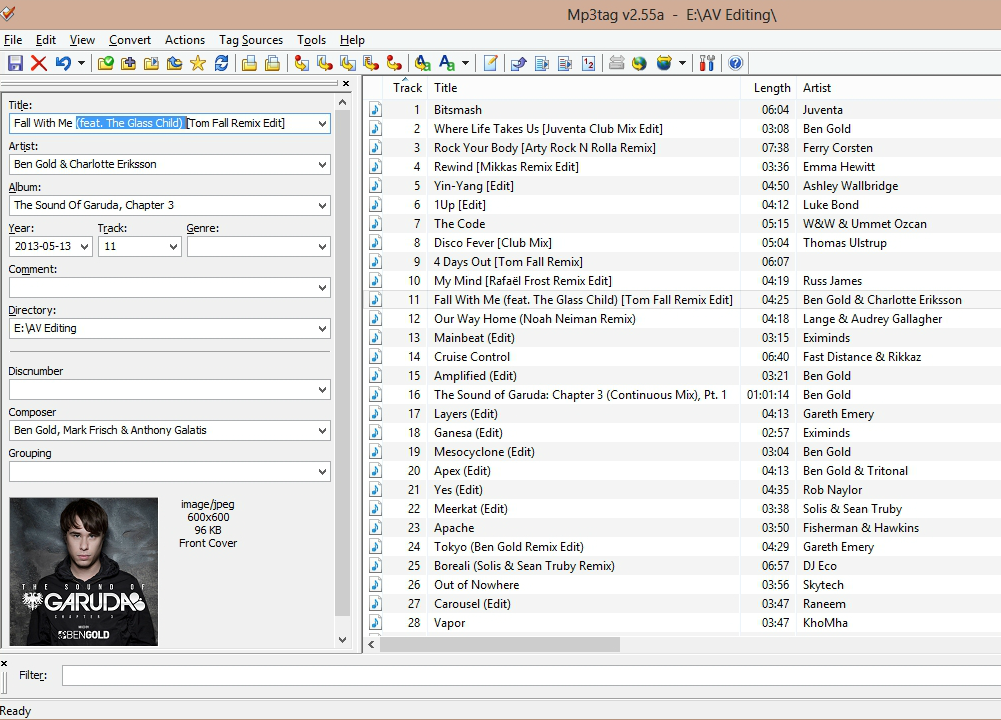
The best tool I’ve found for editing tags in the tracks is mp3Tag because it works on so many different formats, is quick, and is good for both beginners and more advanced users. When setting this up, you can store frequently used naming conventions and completely remove existing tags from “dirty” files if desired.
I tend to select whole releases and start by editing the release (album) title, the year (release date) and artist for all tracks in that release at once. I then look at the extended tags and clear or delete some of them such as the genre and comments unless I see some useful information in them that I want to keep or relocate. Finally, I go through each track and ensure the title and remix is correctly labelled according to my preferences.
You can create some neat macros in mp3Tag that allow you to transform one tag or part of one tag into another. For example, I have an action that allows me to copy the year tag and force it into the iTunes release date field, something which cannot normally be edited within iTunes. Sadly, there doesn’t seem to be any remotely similar app for Macs.
If album artwork is missing then now is a good time to add it. I prefer to add it to the file itself. This adds a little extra size to the file but prevents the need for multiple cached copies to be stored elsewhere in the other tools and music playback devices you use. Two great sources for album artwork are the Discogs website and of course, Google’s image search. I found all but a small handful of obscure tracks from my 14K library during my library revamp from these two sources.
3. Rename and relocate
Once you’ve edited the tags themselves, a tool such as mp3Tag makes it even easier to “Convert Tags to Filenames” and allows you to choose which tags to use to construct the filename. I use “Album Year Track Artist – Title” but you can tailor it according to your needs. Alternative tools such as Bulk Rename Utility can also be useful for batch editing filenames, but the benefit of doing everything in one tool is that you can convert back and forth easily.
Then all you need to do is move the files to the folder(s) of your choice based on the structure you have set up beforehand. By being in control of that structure you ensure that you know where your files are and this gives you added awareness about your library.
4. Audio processing
Tools such as Mixed In Key and Platinum Notes (the latter of which has just had an upgrade) are quite popular among DJs for making adjustments and musical analysis of the audio in each file. Whether you use these tools or not is up to you but they can add some sparkle and information to help with your presentation. A word of warning though. Be aware of excessive claims by software to turn your MP3s into high quality lossless audio files or anything that actually manipulates the frequencies. This could wreak havoc on certain sound systems and potentially corrupt the original audio composition.
For my needs, I use a tool called iVolume to adjust the “Sound Check” level used by iTunes and iDevices to ensure a consistent volume when listening to my music. This is basically level normalisation but with the caveat that the audio in the file itself is not actually affected, just the playback software is told to alter the volume. In addition, I import and analyse the tracks in Trakor which then adds both the BPM and key information to the digital files.

5. Add to library
The final step is to import or add the new files into my music library, iTunes. All the metadata I added and edited in the files themselves is then read and pulled into the iTunes database, ready to use. There are a few things I might amend within iTunes once this is done. For instance, I might ensure Album Artist exists if required, check whether the selection of tracks is a compilation or not, and of course add the new files to my “Rate Me” playlist.
This is the playlist I use to add information such as genre, star rating, comments etc. which I prefer to do while actually listening to the track. You may also need to import or transfer the new tracks into the DJ software of your choice if you haven’t already done so.
And there we are – we’ve reached “deck-load”. With all your tracks refined and organised, it should now be much easier to find, load and play your new tracks as part of your well organised library.
Baby steps are better than no steps…
Back in the second article of this series I recommended that you “start as you mean to go on” when it comes to music library organisation. Starting somewhere is important. Some may argue that this workflow is too much effort and again it’s down to you to determine where you start and what you’re willing to do. Nobody is saying you have to do this all at once (like I did) so here are a couple of extra tips and ideas to get you motivated. Many of us listen to music via our phones, music players and tablets. Whatever music and playlists you have on those devices, why not organise this while you’re listening to it, a few tracks at a time.
“But I can’t edit tags on my phone” you might say. Wrong. There are things you can do. Sure it may not be as direct as with a keyboard and large screen but here’s what you could try:
- Rate each track using the star ratings in the music player (all iPhone/iPads have this)
- Create new playlists titled as genres. Add new tracks with the same genre to these playlists as you listen to them. When you synchronise your device with your music library the playlists should transfer across. You can then select all tracks in that playlist and edit the genre tag for all of them to be the same, permanently adjusting their genre. Repeat this technique for other fields that are common among tracks eg energy levels in the comments field
- Write notes about tracks that you need to adjust or organise. Put them in a separate “to do” playlist
- Prepare cue points and loops using apps on your devices or note down your desire to do this. Some iOS DJ apps now allow you to prepare your tracks for DJing while you’re on the move (Traktor DJ, djay). This is an excellent tool and although not strictly speaking, part of your music library organisation, it certain aids the workflow and speed to using the track when playing
Each of these are examples of making use of what you have to hand to aid your music library organisation. Nobody is forcing you to do this but it may just help.
Finally…
Having a workflow is important and there are plenty of other tools you can use. I’d really like to hear about your suggestions, particularly if you’re a Mac user. Your workflow may be a lot simpler than mine and it would be great to know what works for you and if you have any tips for all of us.
Check out the other parts in this series:
- 5 Reasons To Organise Your Music Properly – Part 1
- How To Get Started Organising Your Music – Part 2
- Choosing The Right File Formats For Your Music Library – Part 3
- An Essential Guide To Organising Your Music Library – Part 4
What workflow do you follow when adding new music to your collection? are there any extra tools that are part of your process? Please share your thoughts in the comments.

Andre Shenoi


