


We’ve finally arrived at the tail end of our training series on using Traktor’s Remix Decks. It’s been a wild ride for us here at Digital DJ Tips, and we hope it’s been a real eye-opener for all you Traktor users who haven’t got to grips yet with incorporating Remix Decks in your performance.
Just to recap, in the first episode I explained what a Remix Deck is. I showed you what Remix Sets are and how they work with a Remix Deck, and I also talked about what kind of hardware you can use to control them. In the second episode, I demonstrated five simple and practical techniques that you can use to start using Remix Decks during your DJ set ASAP.
In this third and final part, I’ll show you how to set up Remix Decks within Traktor, how to hook up your Traktor Kontrol F1 if you have it (if you don’t, you might want to pick one up after going through this series!), and basic Remix Deck operation. As a bonus, I’ll also share some set preparation tips that I’ve devised to make planning and executing a Remix Decks performance a smooth affair. Knuckle down, Traktor-heads, and let’s get at it for one last time!
Setting up Remix Decks in Traktor
One of the coolest things about Remix Decks is that it’s already included with every copy of Traktor Pro 2; no need to spend extra cash for add-ons or expansion packs. As long as you’ve updated to the latest version (Traktor 2.6.8), you shouldn’t have a problem, and even though you have an older installation of Traktor, Remix Decks have been a part of it since version 2.5.
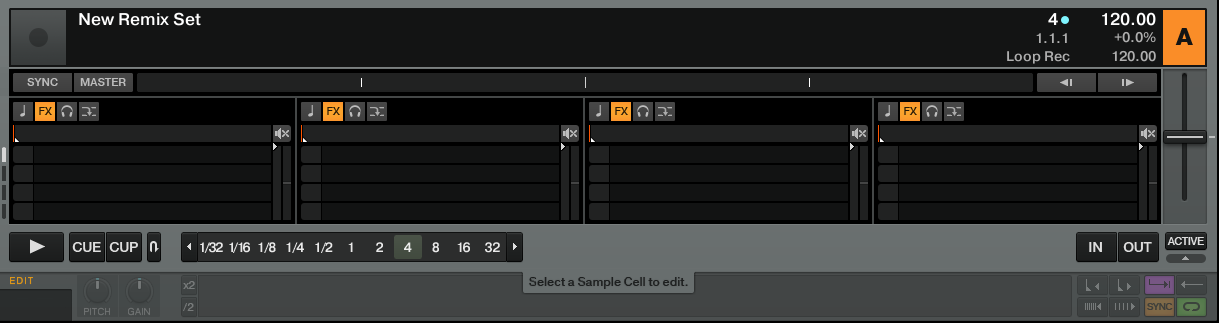
Enabling them is simple: It’s just a matter of changing the track deck. To do this, you click on the track deck name and choose “Remix Deck” from the drop down list. Done! You’ll know you’ve switched a normal track deck into a Remix Deck once you see four columns with empty cells. This is where you can load individual audio loops, samples, and one-shots from your collection, and this is also where all the audio files in a ready-made Remix Set go.
Hooking up your Traktor Kontrol F1
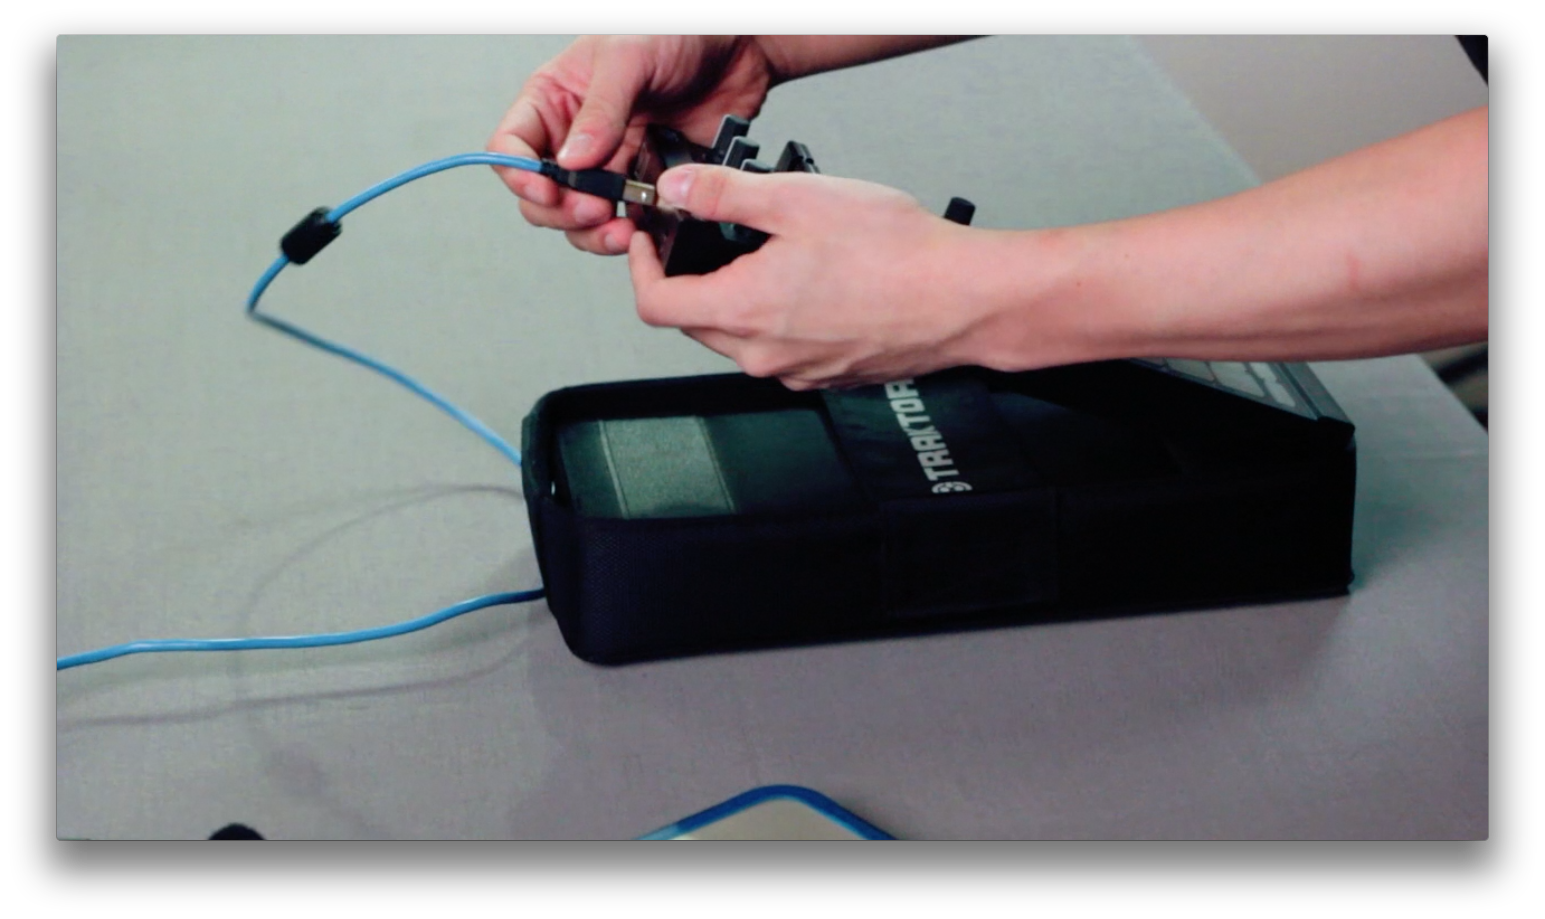
Personally, I think the best way to control Remix Decks is with the use of Native Instruments’ very own Traktor Kontrol F1. It has all the essential functions you need to launch and manipulate clips without becoming another crowded, button filled Midi device, plus it works straight out of the box. You can even use it standalone or alongside any other DJ controller on the market. Connecting it to your laptop is easy: Just use the supplied USB cable to plug one end to your computer and the other to the back of the Traktor Kontrol F1. It’s bus powered, so it doesn’t need a power brick or any other power source apart from that single USB connection.
Loading Remix Sets onto a Remix Deck
Now that you’ve enabled a Remix Deck within Traktor and you’ve hooked up your controller, it’s time to load it with a Remix Set. Demo Remix Sets are included in every Traktor Pro 2 installation, so again you don’t need to go out and buy some just yet, although you’re going to want to get some once you’ve got the hang of performing with them (I can’t recommend the new sets enough!).

In Traktor’s browser, scroll down to Playlists and click on Demo Remix Sets. You’ll see that there are five Remix Sets within this folder for you to mess around with. I recommend loading the Heartbeat Racing set, just so we’re using the same set in this demonstration. To load the set, click on it and drag it over to the Remix Deck that you’ve enabled previously. You’ll see all the empty cells fill up with different coloured audio clips.
Launching clips in a Remix Deck

With the Remix Deck cells loaded, it’s time to start launching them. To do this, click on the upper left button on your Traktor Kontrol F1; doing so starts a drum loop. Once you’ve got this going, you can use the fader above it to control its volume, and you can use the filter knob to filter out high and low frequencies. To stop the drum loop clip from playing, hold the Shift button and press the Stop button at the bottom of the Traktor Kontrol F1.
If you don’t have a Traktor Kontrol F1 controller just yet, you can still launch clips using your mouse: Bring your mouse pointer over to the first cell of the Remix Deck (it’s the yellow cell on the upper left), and left click to launch it. If you want to stop the clip from playing, hold the shift button on your keyboard and left click again.
That’s it for the basic operation of a Remix Deck! Go ahead and go crazy by launching different combinations of clips; you’ll notice that you can only launch one clip per column, but as many as four clips per row. You’ll also notice that clips don’t start and stop exactly when you press a button or click on them: That’s because you have quantisation enabled, which aids in launching clips so that they start and stop on beat. To hear how this affects your performance, go ahead and turn quantisation off; you’ll be able to launch clips whenever you want, but a wrongly-timed press can turn it into quite the train wreck! For folk starting out, I suggest leaving quantisation on until you’ve more experience using Remix Decks.
Creating your own Remix Set
If you want to use Remix Decks as a sampler or if you want to perform your own compositions / productions made from loops and one-shots from your hard drive, you can load audio clips onto a Remix Deck and save them as your own Remix Set, just like I did in part two of my video. I suggest creating a folder for each Remix Set that you plan to make just to keep things organised. Put all the audio that you want to place in the Remix Set into that folder (eg “Deep House Samples”), then fire up Traktor and enable a Remix Deck. Load the audio files onto the empty cells (in the video, I did this ahead of time and grouped them according to BPM and musical key).
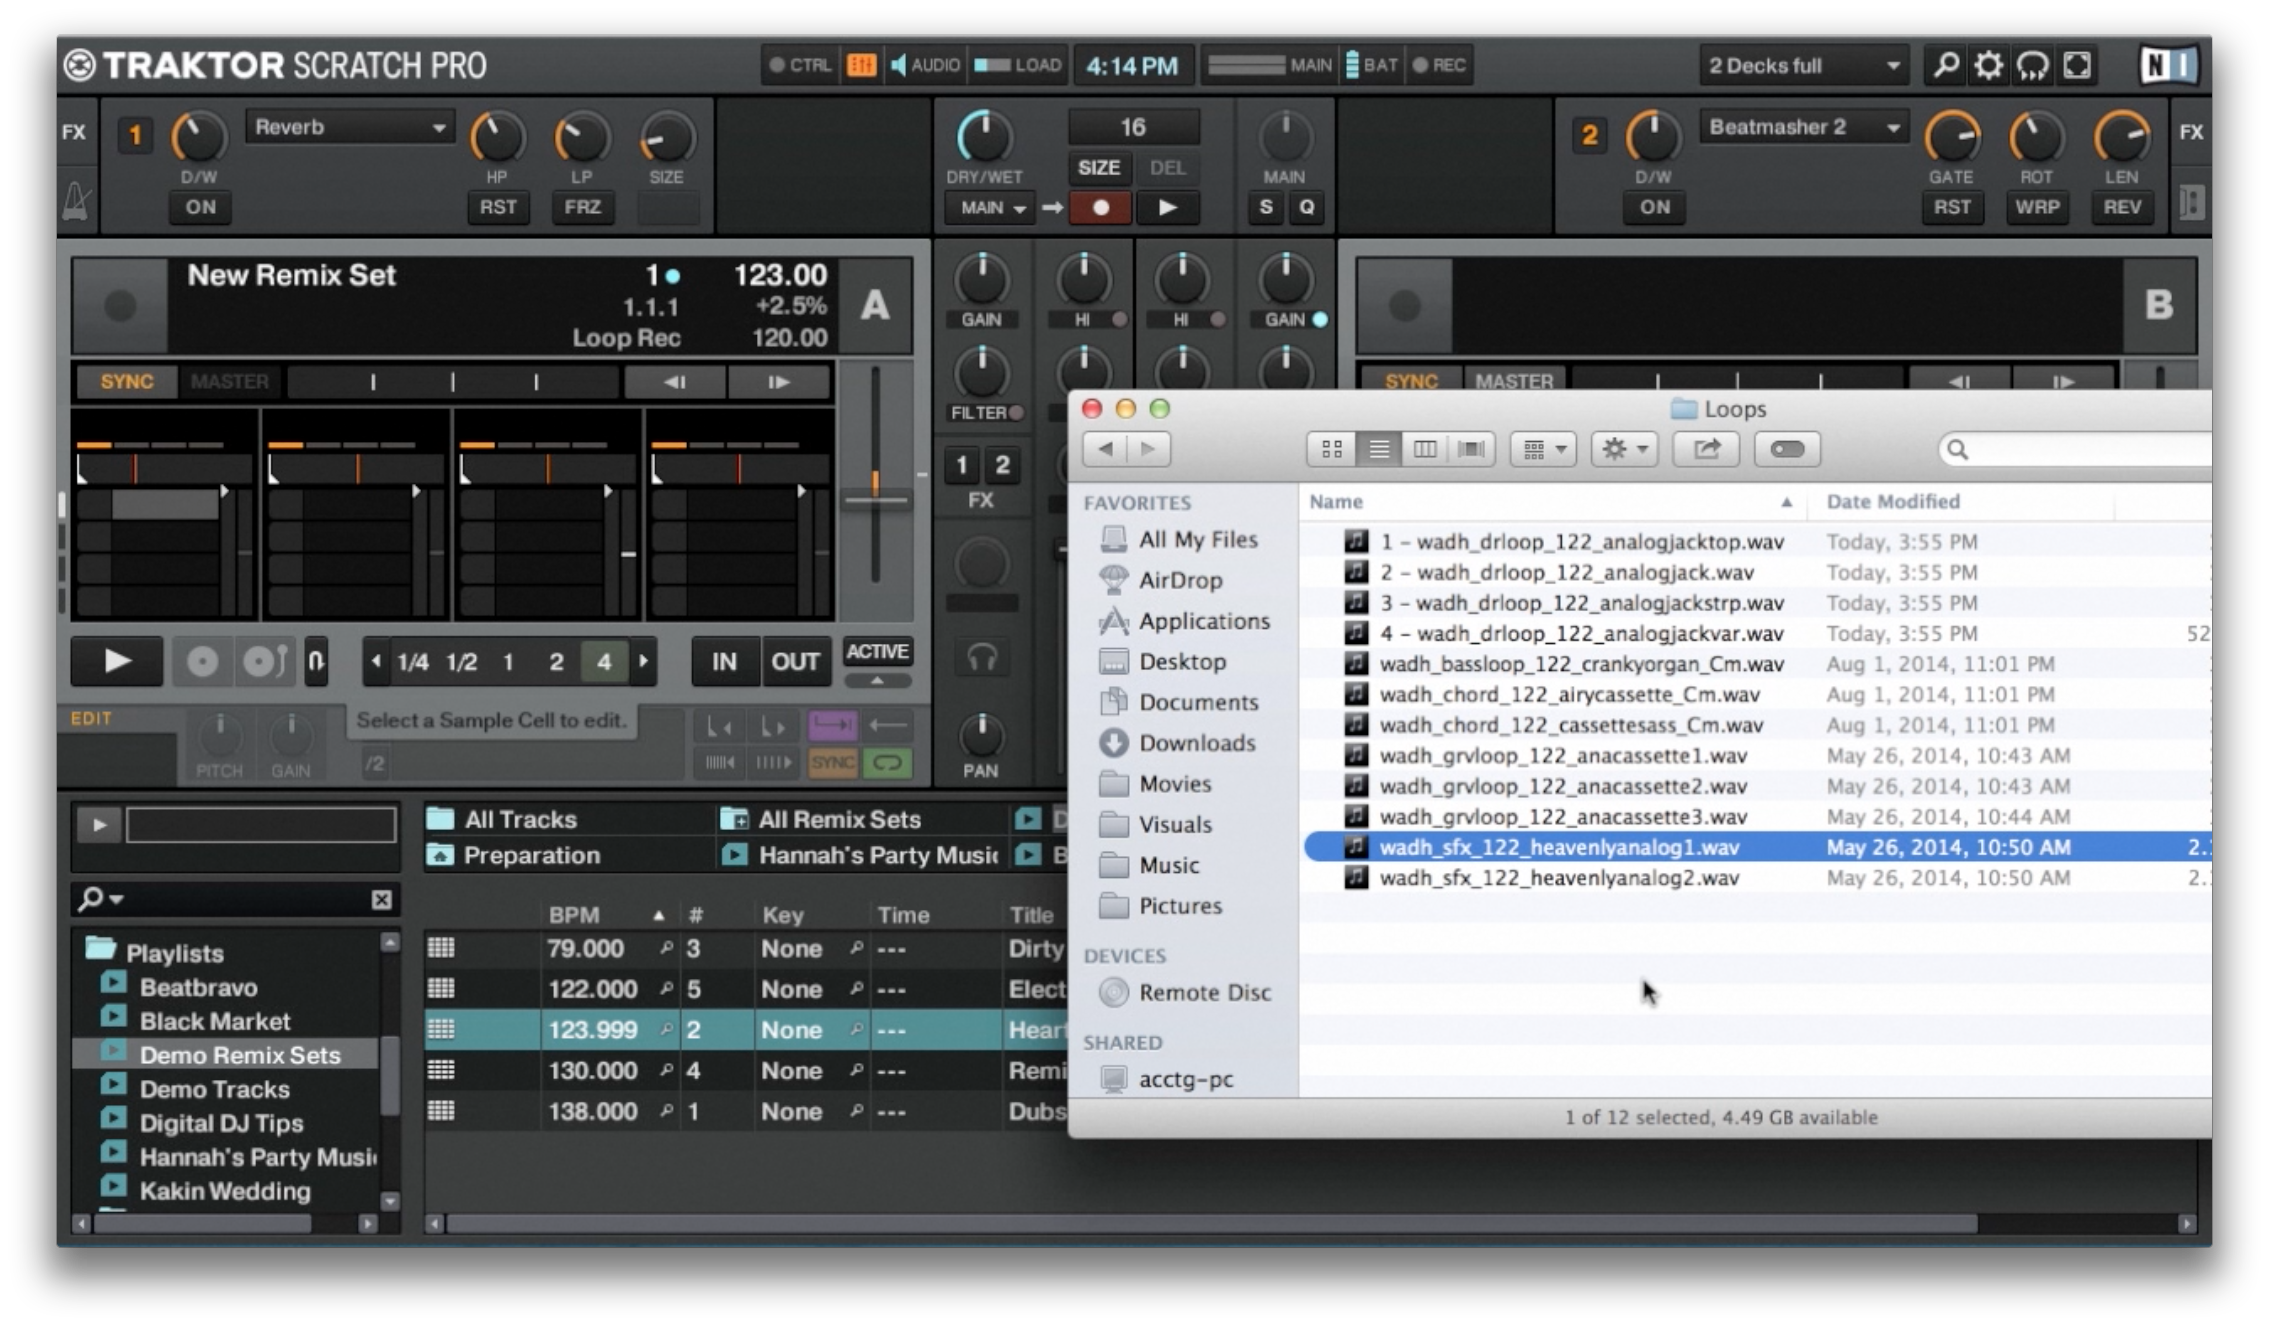
You can audition how they sound like together by launching them; you’ll notice that the clips stop playing after one pass, and that’s because Traktor recognises them as one-shots at this point. To turn them into a loop that repeats indefinitely, just click on the clip cell you’d want to change and click on the arrow icon on the lower right; doing so will change the arrow icon into a loop. Do this for the rest of the cells that you want to change into loops. To save your Remix Set, click on the deck name and choose Save Remix Set.
Recording audio onto a Remix Set
Readers have been asking how to get bits and pieces of songs they have in their library onto a Remix Set in order to create their own mashups. Getting those samples is the easy part, as I’ll explain in a while, what’s a bit more complex is knowing which ones go well together! I suggest choosing songs that have the same musical key and BPM, as these two characteristics greatly increase the chance that those loops that you’ve lifted from songs will play well with each other. Of course, not all songs in the same key and tempo sound good together, so at the end of the day, let your ears be the judge! The quickest way to go about doing this is to make a list of songs that you want to record parts from and stick them in a playlist within Traktor.
Load your first song onto Deck B if you have Deck A as your Remix Deck, and then set cue points at portions of the song that you want to record. In the video, I put cue point one at the start of the track because I want to record drums, cue point two at a part of the song where the bassline comes in, and cue point three where vocals in the song happen.

The reason for this is that you can record up to 32 bars of music after a cue point onto your Remix Set. By setting cue points before you start recording, it’s like you’re dropping markers at points on the track that you’d like to record so you don’t have to go play the entire song over and over again just to lift parts from it.
To record onto a Remix Set, enable the mode first by pressing the Capture button on your Traktor Kontrol F1. A number will be shown on the controller’s display, which is the number of bars it’ll record starting from your cue point. I like keeping mine at eight bars as a personal preference, and you can do the same. Now press cue point one which will take you to your first cue, and press on an empty cell button in your Traktor Kontrol F1. You’ll see it light up signifying that you’ve captured the audio, which you can playback by pressing it. Continue to do this for all the cue points and all the songs in your playlist, arranging them as you see fit.
Set preparation tips

Using Remix Decks when you DJ can be a spontaneous affair; you can load a bunch of samples as a Remix Set and trigger them throughout your performance, as I’ve demonstrated previously. However, if you plan on using Remix Decks more extensively or even exclusively during an entire performance, you’re going to want to do a lot of preparation and planning to get your live set running smoothly.
In the video, I explain how to lay out the individual tracks of Remix Deck on a piece of paper or on a whiteboard. The importance of this lies in the fact that it’s easy to get lost among all the buttons that correspond to all the different samples that lie in a Remix Set, even though you’ve already properly labeled them within Traktor. Further, writing track labels down helps you remember them better. Aside from labelling your tracks analogue-style on a sheet of paper, I also recommend naming the rows of a Remix Set by organising them in segments (eg intro for row one, verse for row two, and so on) and writing them down on the same sheet of paper as well. This further reduces performance confusion (“What part of the song am I in now? What does this button do?”), and serves as an essential guide when creating your own Remix Set so that you don’t just drop in loops willy-nilly.
When creating more complex Remix Deck performances, you might want to use a technique I call Grid Logic, which you can check out in the video as well. I basically give an alphanumeric name to each cell on the Remix Deck, and then I write down the sequence of button presses that I do in order to execute each song segment, effectively creating a guide with which I can refer to during a live performance, quite handy if ever I get lost while executing a set.
In closing
The remarkable thing about Remix Decks is that they have a dual personality: While they may look complicated at first glance, they’re actually pretty easy to use once you get the hang of them. And though they may seem “over-simplified” to the seasoned controller professional using software like Ableton Live and Bitwig, you’ll be surprised at how satisfyingly complex a well-planned Remix Deck performance can be when executed properly.
I hope that this tutorial series has helped to makr the Remix Decks more accessible to you, because they’re worth the effort. Now go get remixing!
This week’s video
Here are the other parts in this series:
How have Remix Decks changed the way you DJ? How have you been using them in a live performance? If you haven’t started using them yet, what’s holding you back? We’d love to hear your thoughts in the comments section below!

Joey Santos


