

The Lowdown
The Mevo Start is a clever little livestreaming camera with its own battery that can livestream directly to Mixcloud Live, Twitch, YouTube, Facebook and most other platforms of your choice, without the need for a computer. You control it via its equally smart phone app, and it has a line-in for your DJ mixer or controller. Recommended.
Video Review
First Impressions / Setting up
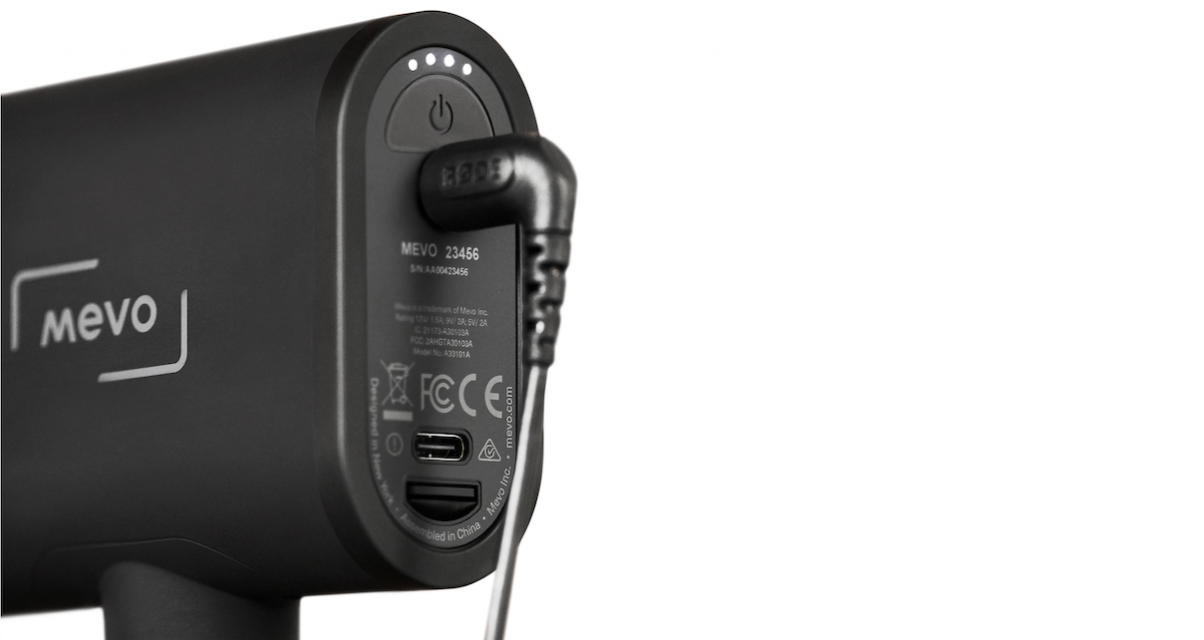
The Mevo Start is a pleasing object – a small, dark grey rubberised rectangular device, with rounded edges, and a mounting thread for a tripod or similar on its underside.
On the front are the Sony lens and a small status LED, and around the back are a USB-C socket for charging and connecting to a network or computer, an 1/8″ input jack socket, and an on/off button, plus an array of four tiny white LEDs to show you things like when the device is charging, and current battery level.
It is heavier than you might think (that’ll be the battery), and overall is about the size of a couple of packets of playing cards, or a very large bar of soap.
Setting up the hardware
The idea is that you set your Mevo up, get it onto the same WiFi network as your phone, and then it uses that WiFi network’s internet connection to “go live” from, as well as via which to communicate with your phone, on which you run the Mevo app to control the device and your broadcast.
In this way it’s something like Sonos, where your phone is again simply a control device – set something running on Sonos and leave the building and it’ll happily continue to function. Likewise with the Mevo: Your phone is simply issuing instructions (and acting as a monitor, as you’ll see).
So basically you get the thing charged, download the Mevo app for iOS or Android, and follow the instructions to get it on your WiFi network. It can remember networks it has seen before.
There is also an option for it to set up its own ad hoc WiFi network just for it and your phone, which allows the Mevo to broadcast via your phone’s 4G etc should there be no WiFi internet available – great for livestreaming gigs outdoors.
Read this next: 10 Lessons I’ve Learned From DJ Livestreaming On The Road
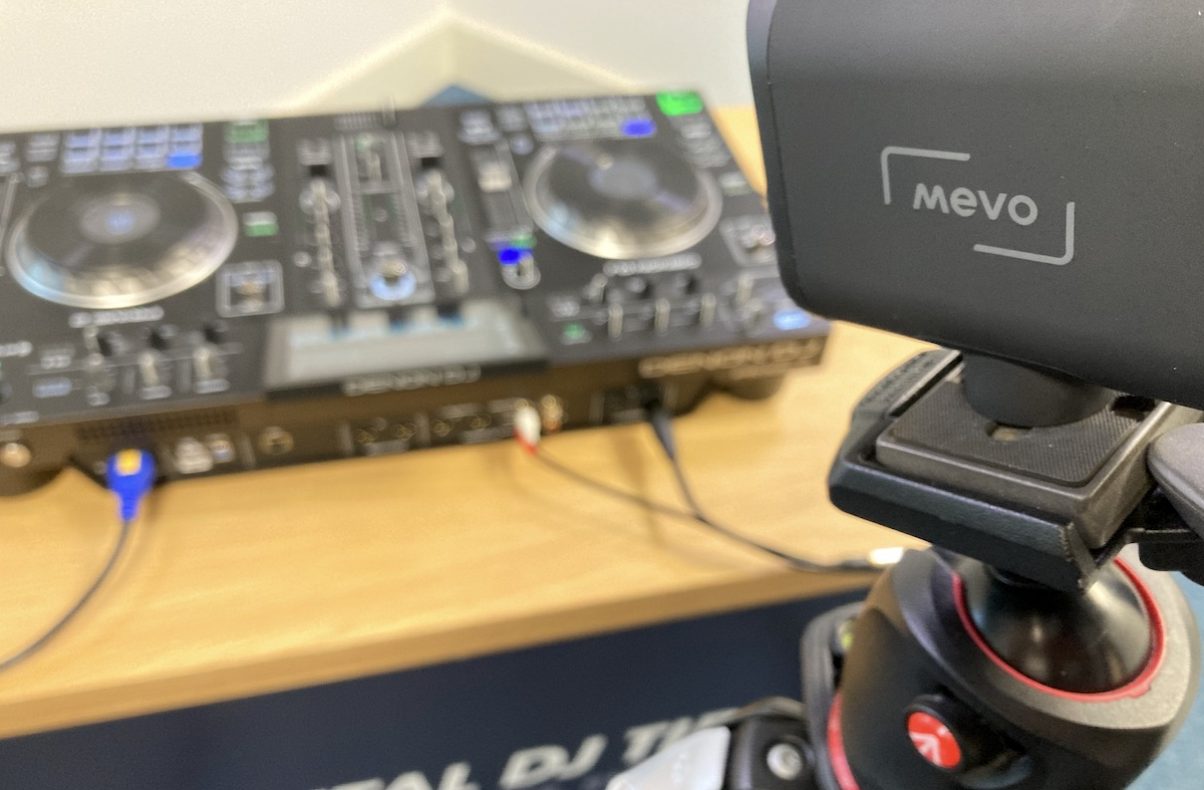
With this done, your next job is to connect up your DJ system to Mevo’s audio input, which you can do with a simple RCA to 1/8″ stereo minijack cable (I have a three metre one which I found to be long enough – the camera will easily get you and your gear in one shot from four or five feet away.)
So with connections made and everything turned on, let’s look how to actually use it!
In Use
Setting your shot and audio
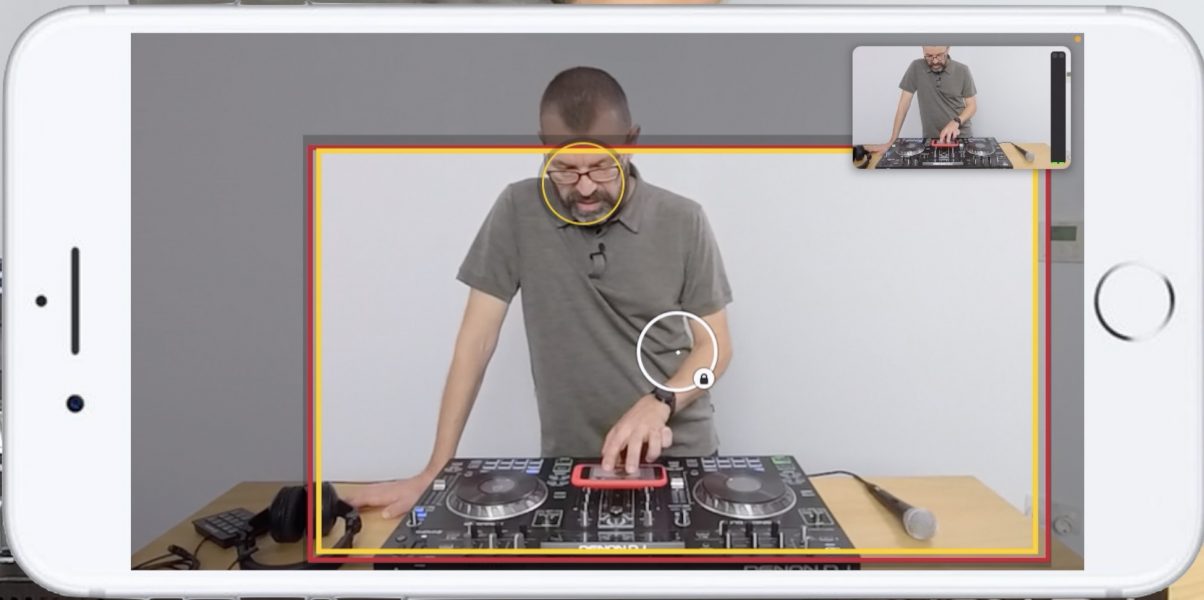
As your phone acts as your monitor for your broadcast, it is easy to set up your shot, because you can walk front-of-camera with your phone in your hand and test out your DJing position with you in the picture.
That done, you’ll next want to explore some of the features of the app before you go live for the first time.
Tweaking the audio
Firstly, you’ll want to get that audio working correctly: A tap on the three dots far-right of the app brings up some set-up options, including for audio, and a tap on that icon gets you to the “Audio Mixer”.
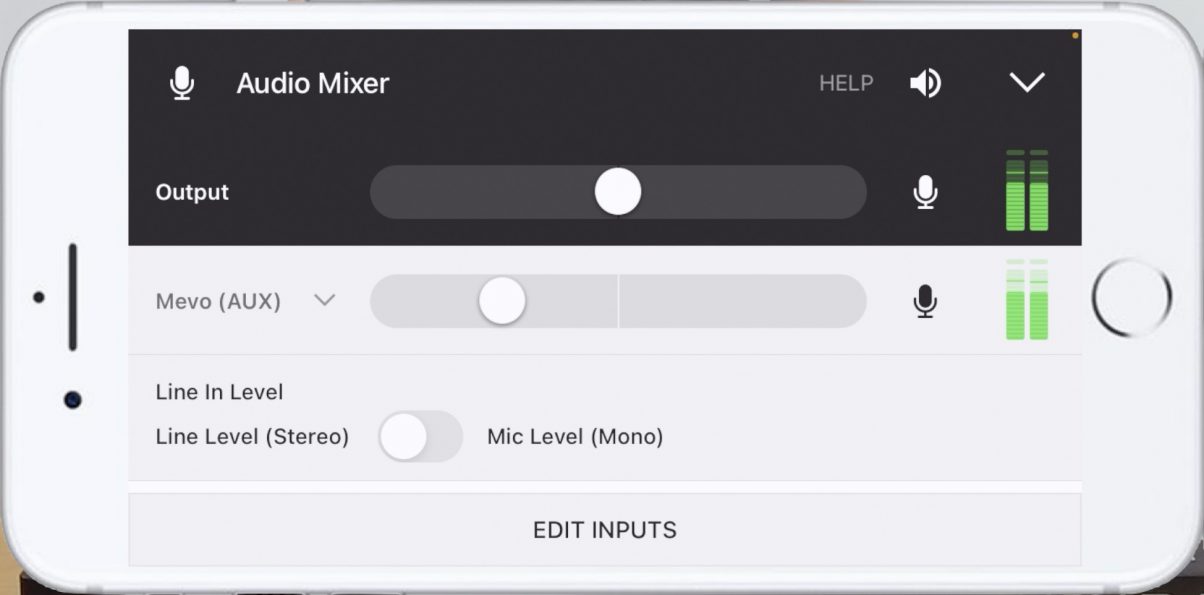
Here you can set the overall Mevo volume, the output volume, but most importantly, set “line in” and a level. I found about 25% level was right with a controller set to 0dB, but you’ll want to experiment with your particular kit. I recommend feeding audio from its own output (ie use a Booth output for Mevo and the Master output for your monitor speakers), so you can find a setting that works and not touch it further. There are ways of adding more audio, including a phone app that hijacks your phone’s mic, which is neat.
Learn to DJ livestream with us: DJ Livestreaming Made Easy
Exploring the set-up menus
Also on this menu are plenty of manual controls for the camera, including presets – you can use HDR or not, prioritise shutter or go full manual (I left it on Auto though), tweak exposure (I found +0.4 compensated a bit for a bright background, even with HDR on), and other things – even white balance. It’s impressive.
Assuming you put an SD card in your Mevo (you should, because it means you can record all of your livestreams), you can access your recordings from here, and there are also some advanced settings and utility options here, including frame rate. One option I did appreciate was “Auto Wide On App disconnect” – basically, if you lose the connection between the Mevo and your phone, it will carry on working but revert to the wide shot. As you’ll find out, I had to use it.
And you can also decide from here whether the Mevo will seek out faces in shot (it does a pretty good job of these), and whether when you pick out a face in your broadcast, it follows it. This is great for zooming in on you as you give shout-outs to viewers, and it looks really pro to move a bit and have your head stay centre – it’s like having a camera person! (A viewer said on one of my livestreams, “who is doing the camera work?”)
Going live
Clicking the big, round red “live” button bottom left brings you to the menu for going live. Here you can choose to record to SD, or to go live directly to Facebook, YouTube, Twitch, or several other services – no native Mixcloud yet, though. No worries because for any service not listed, there is an “RTMP” option where you can enter the RTMP address and stream key provided by your service and you’re off.
If you use a service like Restream to broadcast to more than one place at once, you can enter its RTMP details here too.
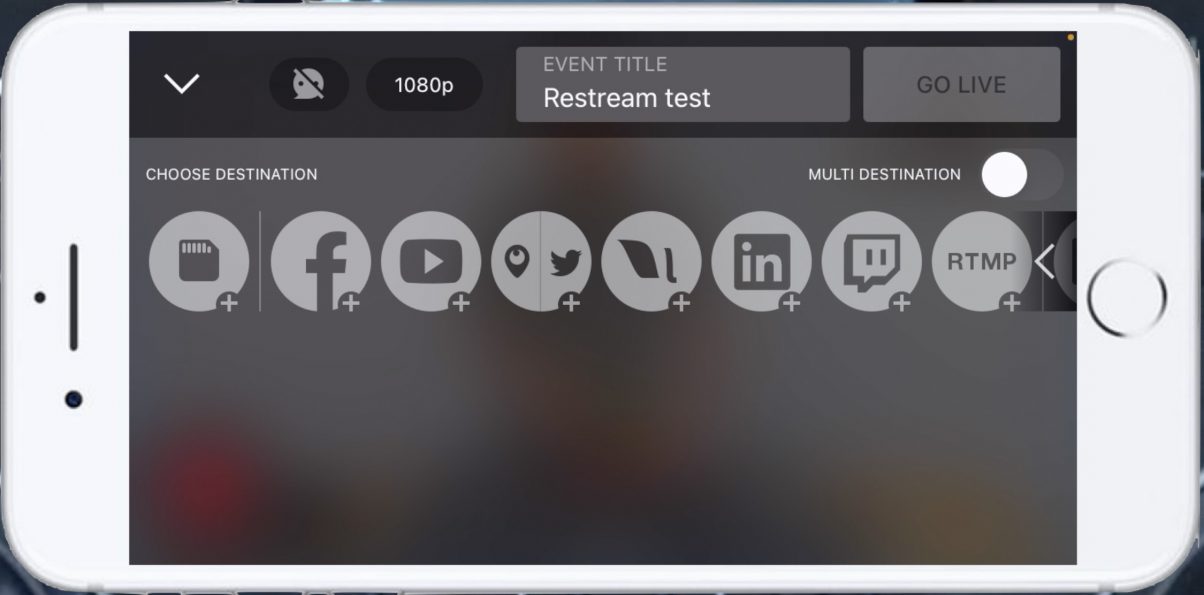
Here you can choose whether to go live at 1080, 720, 480 or 360 – so it would be possible to livestream on a very slow connection if you went as low as 360.
You hit “go live”, wait while it connects, then a clock ticks to tell you you’re up and running.
Directing your shoot
Even if you are actually DJing, it is easy to keep your broadcast dynamic thanks to the easy-to-use controls provided on the phone app.
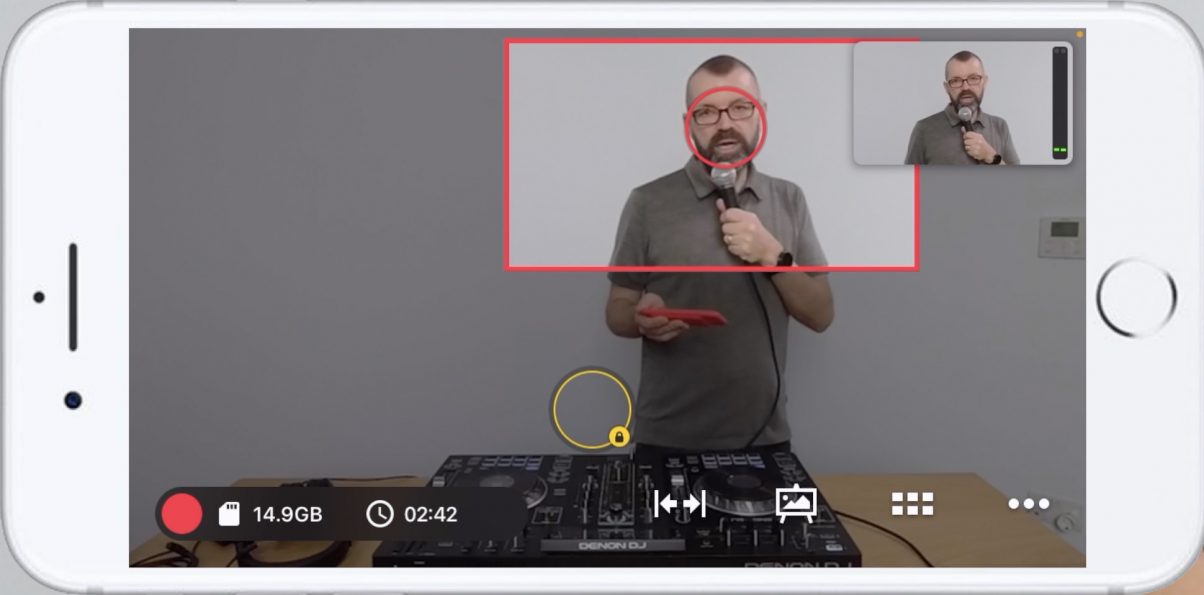
Tapping on anything on the screen zooms immediately to it, you can pinch and expand your fingers to zoom in and out, and swipe to pan. The Mevo will make sure your moves are all smooth on the actual broadcast.
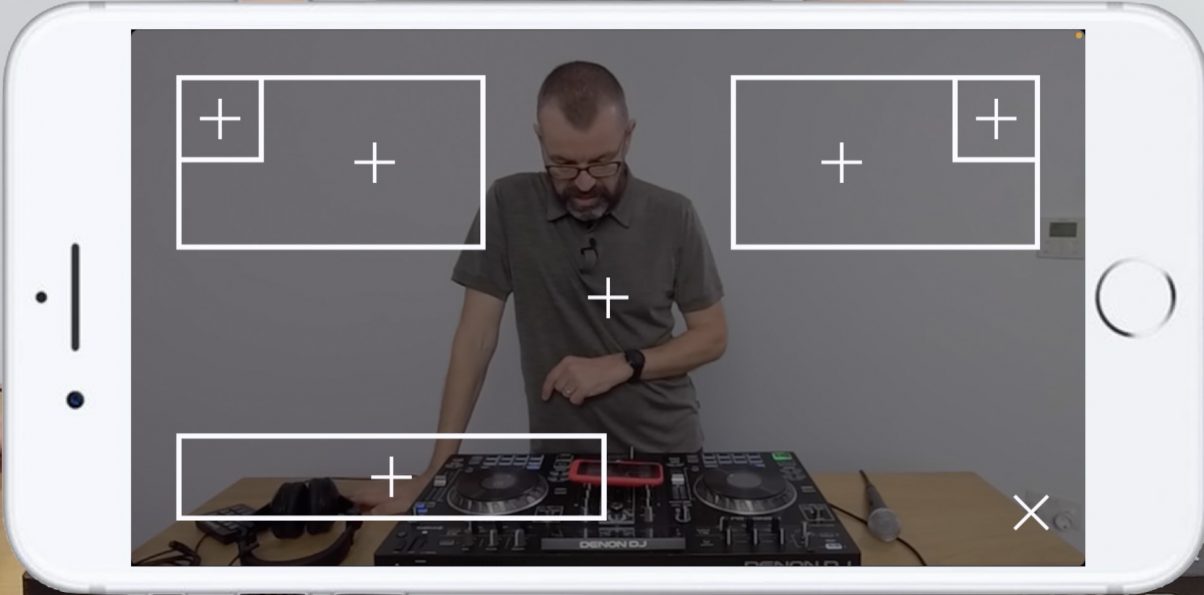
Holding your finger on a zoomed in area brings up a “+” sign, and if you move your finger to it the Mevo will remember that static shot so you can easily switch to it by tapping its marker on-screen whenever you want. Great for DJ gear close-ups when you’re transitioning between tracks.
Learn to livestream your DJ sets like a pro: DJ Livestreaming Made Easy
It gets better though: By holding your finger on the circle representing the static shot, you get additional options that you can activate by swiping toward them, two of which are a tortoise and a hare. These will slowly or quickly zoom in to the shot – so you really can have it look as if you have a camera person.
Likewise, if you set the options to find faces and follow, you can set up a similar shot, but this time, when you switch to it it will keep the face of that person (ie you, the DJ) in the middle of the shot.
A small “wide angle” icon will take you back to the main shot when broadcasting, and again, you can hold the button for the tortoise and hard zoom speed settings. All your saved shots can be accessed on one screen if you like, although it is just as easy to control them from their markers on the main screen.
The currently live view is shown in the top right-hand corner at all times, where you’ll also find audio level VUs – drive them into the red and it will distort, so be careful, especially when speaking on your DJ system’s microphone.
To finish your broadcast you tap on the red dot, and it prompts you to “slide to stop” – a bit like when you close down an iPhone. It disconnects you from the platform you are connected to, and finishes your recording.
Thoughts on use
I was interested in Mevo because I do not want to have to worry about a laptop when DJing and livestreaming, especially on location. Even if you DJ from a laptop, to have to switch between your DJ software and broadcast software on the same machine and screen requires organisation and a powerful computer.
But conversely, to simplify your livestreaming by trying to do it live from your phone requires a good audio interface, probably a battery pack, and even then you’re stuck with pretty boring videography, as most broadcast phone apps give you few or no options. Plus, you can hardly keep running to your phone to control your broadcast if it is on a tripod being your camera! (Streamlabs is the best of the popular phone broadcast apps, for the record.)
That’s another reason I was interested in it – I do my broadcasts unaccompanied, so I need to be able to control everything about them myself. Mevo seemed perfect for that.
And by and large it was.
I did suffer from the stream going down once (it has never gone down over the same wiFi network when using a laptop system), and also losing connection between the phone and the Mevo (the same broadcast) – I suspect there was a WiFi issue that day, because it hasn’t thankfully happened since.
Start livestreaming your DJ sets like the pros: DJ Livestreaming Made Easy
I also did indeed find it liberating to be “free” from the laptop. We stream currently to Mixcloud Live, Twitch and YouTube, using Restream, and I have the YouTube app open on my phone as well as the Mevo app, switching between them. I simply read out shouts from my audience directly from the YouTube app by reading them off the phone.
I found it best to keep the phone in full view of the audience (I balanced it on a speaker) and held “high up” when reading interactions or switching things up on Mevo, to save you looking like a boring person on the street starting down into their phone too much. I even showed it to the audience a couple of times to show them the Mevo app and give them a sense of what I was doing!
One of my livestreams filmed using the Mevo. I found it liberating not to have a laptop for either DJing or livestreaming.
My livestreams take place with a truly gorgeous sea and sky backdrop, and a great shot to do is the sky. I set up a static zoom shot of the sunset that was happening in the top left of my wide shot, and had the software slowly zoom out from that to the full shot of me and my gear, and it looked great.
Worth knowing that the overall resolution is 1080, so if you’re broadcasting in 1080 and you zoom, you’re going to get image quality loss. Doesn’t really matter for people viewing on phones, but anyone watching you on YouTube on their 60″ TVs will notice. Then again, they’ll probably notice all the livestreaming compression applied by your platform too, before any of that.
Other features
The camera system does have other features and settings. You can use it as an NDI camera with laptop streaming software (meaning it’ll work over ethernet – with an optional adaptor – or on WiFi as part of a laptop-based broadcast system), which I actually did on one of our studio broadcasts, and it worked great over just WiFi for that. There is an optional Ethernet adaptor you can get for it, although I suspect any USB-C-to-Ethernet adaptor would work.
It also works as a webcam app, wireless with a laptop utility from Mevo (Mac only at the moment), or wired without the need for separate software. By the way, there are built-in microphones to capture stereo sound, not that you’d use them for DJing of course – there’s even a mic app to turn your phone into the unit’s microphone. Again, I didn’t use this.
One interesting feature is the auto-pilot mode – it’ll track faces AND make live edits for you, tracking and cutting to where the movement is in a shot. I didn’t try this on a live DJ broadcast – but it looks pretty cool and I might.
The subscription option
Mevo as a name is tied to Vimeo (the company was owned by them, and still has strong connections), but everything I have described to you here does not require you to have anything to do with the Vimeo platform.
However, two functions do require you to have a “Vimeo Producer” or higher subscription, at $15 a month. These functions are multicasting, and screen overlays. Let’s look at them in turn.
Multicasting lets you broadcast to more than one platform at once, right from the app. You can set a title for the broadcast (although no description), select your platforms, and go. In the background, Vimeo takes care of re-broadcasting your stream to the platforms you have chosen. It is the same as using Restream (the service we use) although in theory even more convenient, as it is all controlled from the Mevo app – but we did not test this.
Screen overlays let you add words, photos and even transparent “full screen” overlays. You can have lower thirds, top left/right “bugs”, or full screen images, and even videos apparently, though I didn’t try the latter. Images can be added from your photo library on your phone, and you can build your own text and choose background and text colours from within the app. They get uploaded to the Mevo, and you can then move then into or out of your broadcast from a little menu at the bottom of the app screen. They are there for you every time, from then onwards, until you delete them.
We found them useful for intro and outro screens, and we also used a transparent overlay containing our branding and the platform details for where we were live. Our company already has a Vimeo Premium subscription, so we didn’t have to subscribe just to get this.
Conclusion
For DJs, the Mevo is a compelling option for livestreaming. While you might just get slightly better quality video from a top-end phone (what is it that iPhones do to get that video so sweet?), if you’re livestreaming with no computer, you don’t want to use your phone to do it, as… well, you’ll have no phone then, right? But also, you can’t check comments, or do all the things I have outlined above, yourself, while broadcasting. The things that make all the difference and result in a compelling, professional, engaging broadcast.
Read this next: The Ultimate Guide To DJ Livestreaming
Sure, the Mevo isn’t particularly cheap, but you’re getting a camera, a battery pack that can even charge other things if you want (it lasts for several hours…) and an audio interface, and WiFi connectivity, all in one tiny unit. Add an audio cable and a tripod (Mevo sells a floor stand and a desk stand, but we just used a cheapo travel tripod from Amazon) and you can go way beyond what a phone can do.
We have paired ours with a 4G battery-powered router and a data SIM card to give us a totally portable streaming set up that, thanks to the size of the DJ console we’re using (a Denon DJ Prime Go) we can easily fit in a backpack, opening up the possibility of solo, properly produced livestreams from anywhere there’s a phone signal.
I do think Mevo ought to make the app fully functional, minus of course the multi-streaming (for which there is a clear ongoing cost to them) without the need for the Vimeo subscription. It feels stingy to make someone pay $400 for a camera whose selling point is its flexibility, only to disable some of that flexibility in the app unless they buy a subscription. That said, if you wanted to multi-stream too, maybe $15 a month isn’t so bad.
Overall, Mevo is neat, pretty reliable, and quite addictive. As you use it, you begin to realise how polished you can make your broadcasts with just a bit of practice.
What I am really looking forward to is the promised multi-camera mode (now in beta), because as every DJ knows, there are three angles you really want: Crowd, gear, and you. Three Mevos, all controlled from one phone, would make for a truly incredible livestreaming set-up for not much more than $1000, which would move this system even further away from using phones and phone apps.
As it is though, with the caveat that if overlays are important to you and you don’t want multi-streaming, $15 a month is steep, we thoroughly recommend the Mevo Start. We will continue to use it in our DJ livestreams to push its boundaries and report back to you on new features as they are added.
• More info on the Mevo Start web page.

