
If you’re a new digital DJ, you probably have lots of music on CD that you’d like to rip to iTunes in order to use in your DJ sets. You’ll only do this once, though, and so it’s important that you get all the settings right for success. It’s also important that you understand a few of the things you’re doing along the way.
So here’s our quick guide to help you to rip your CDs and get the music safely into your computer ready to start DJing with. We’re going to rip to MP3 at the highest possible quality, which is going to be good enough for most DJs here.
1. Preparing your CDs and initial settings

Before you rip anything, you needs to make sure everything is set up right. Sort out your CDs and check them for dust or dirt – you want a clean rip, first time. CDs can and do jump and splutter and you don’t want to find out in the middle of a gig that your rip went wrong. Make sure you’ve got enough spare space on your computer’s hard drive for the ripping you wish to do (figure about 1Mb per minute of audio for the format we’re about to recommend).
Next, we need to tweak some settings in iTunes. (You can click any of the screenshots to zoom in). Open iTunes, go to Preferences > General and check the box “Automatically retrieve CD track names from Internet” is ticked. It’s next to the “When you insert a CD” drop-down (which should itself be set to “Ask To Import CD”).

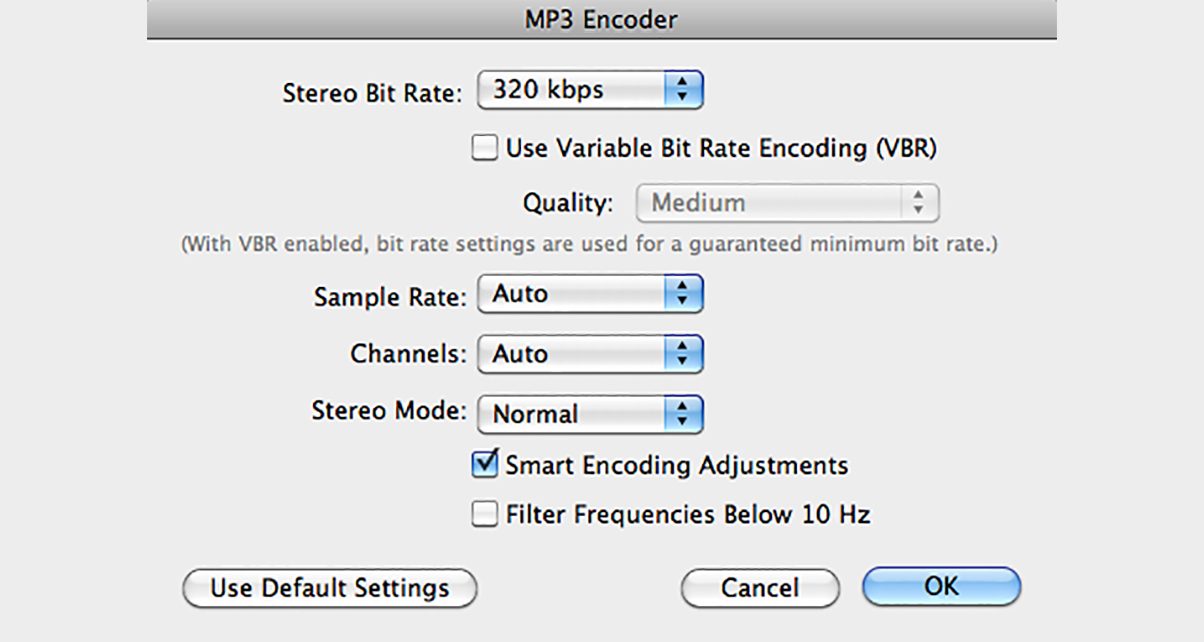
On the Import Settings window that appears, select the input file type to “MP3 Encoder”. Leave “Use error correction when reading Audio CDs” unchecked unless you end up having problems ripping. Finally, in the “Setting” dropdown, select “Custom”.
In the window that then opens (it’s the one in the picture at the very top of this article), set “Stereo Bit Rate” to 320kbps, check that “Use Variable Bit Rate Encoding (VBR) is NOT ticked, leave “Sample Rate” and “Channels” on “Auto”, set Stereo Mode to “Normal”, and untick “Filter Frequencies Below 10 Hz”. Click “OK” to close the window.
Back in the preferences window now, you need to make a decision as to where to rip your music to and how iTunes should organise it. The simplest way is to let iTunes take care of all that, unless you have a compelling reason not to.

Click Advanced to open the Advanced Preferences window, where we’ll set this up.
In this window, make sure “Keep iTunes Media folder organized” and “Copy files to iTunes Media folder when adding to library” are ticked.
Now, anything you ever rip into or play with iTunes will be copied into the folder shown in “iTunes Media folder” location. Make a note of this folder’s location – we’ll need it shortly. Click OK to exit Preferences. We’re all set!
Ripping and finishing off
You’re ready to start. Put your first CD into your computer. After a few seconds in which iTunes queries its online music database to identify your CD, it appears in your iTunes menu with a list of the tracks, and a dialogue box also appears checking that you’d like to import the CD. Click “Yes”.

Now you wait. iTunes will import the CD at typically around 12 times faster than real life, so you’ll have a few minutes to kill until it’s done. You can monitor progress on the screen track-by-track. If iTunes doesn’t recognise your CD, it’ll still import it, but you’ll have “Track 1”, “Track 2” etc rather than names of tracks. This may happen with CDs you’ve compiled yourself, where the CD doesn’t exist in the commercial world.
By later selecting the tracks in iTunes and choosing “Get Info” from the right-click contextual menu, you can add the metadata that’s missing, including cut and pasting a cover image in if you wish (iTunes sometimes can’t find a cover image). Select all the tracks together to enter info about stuff that doesn’t change (album title, cover image), then select them individually for titles. But for 99% of “bought” CDs, you’ll have to do none of this.

One thing you may want to change is the “Genre” field: “Dance and DJ” or “Electronica” may be too vague for you; again, just highlight the whole album, use the right-click menu to “Get Info”, and change the “Genre” field to what suits.This will allow for quick sorting when DJing.
Don’t skip the backup
Finally, back up immediately. And once you’ve done it once, do it regularly. Using an external hard drive, you navigate in your file manager program (ie Windows Explorer on a PC or finder on a Mac) to the iTunes Media Folder location you noted earlier.
If you only want to back up your imported music, open this folder and back up the complete Music folder within. If you’ve bought music on iTunes too, copying over the “Downloads” folder will give you a safe copy of those tracks too. Or – if you never download Movies or Podcasts – just back up the whole iTunes Media Folder. Done.
Finally…
There’s loads you can do now you have your music in iTunes. You can make playlists for individual gigs, and smart playlists that automatically update themselves as you add new music (like, a “reggae” playlist, for instance, or a “non-dance from this year” playlist).
And you’ll definitely want to work out a way of organising your music that suits your DJing. As most DJ software can show you your iTunes playlists, you can DJ straight from pre-organised playlists, giving you a chance to do much of of your preparing in iTunes, not in your DJ software.
How you choose to organise your music is an intensely personal thing, but here’s how I organise my music in iTunes. It won’t be for everyone, but it works for me. Happy ripping!
Are you in the process or ripping music to your library? Did you ever do it but mess it up and have to do it all again? Do you do it with different software or in a different way to that which I suggest here? We’d love to hear your thoughts and stories in the comments.

Phil Morse


")